Tampilkan postingan dengan label master bedroom. Tampilkan semua postingan

Rabu, 24 Juli 2013

DIY tufted headboard tutorial

Hello all! I’m so excited to share more about how I made the new headboard in our bedroom. I shared more about the start to this room redo, the new bed and the headboard earlier this week.

I’ve made my own headboards (and for friends!) for years – even before blogging. It’s seriously one of the easiest DIY projects you can do and you will save SO MUCH money doing it on your own.

The headboard part I was used to – but I was totally intimidated by the tufting part. I’ve never tufted one because it seemed like it would be hard…but it is not a big deal! For real, it wasn’t bad at all.

So here we go – I new the shape I wanted the headboard to be for awhile, but I just found out the other day that it had a name:

different shapes of headboards

I wanted the Belgrave look, which was totally easy to DIY. First up, Dad came down and we used his truck to pick up a big piece of mdf at the hardware store – it was a big four by eight foot piece and the Lowe’s Guy cut it down for me:

DIY tufted headboard

I wish I would have taken pics of how I cut the corners out, but it was so quick. Dad and I just searched the garage for something round (and used my bird food holder). I held it up on the corner and figured out how big of a cut out I wanted, then did some quick measurements to make sure it was even on both sides. Then I traced the bottom of the can and cut one side out with the jigsaw. That first piece is all you need to make the second one – just flip it over and place it on the other corner, trace, and you’ve got a mirror image.

I hope that makes sense – it was so fast I didn’t even think to take pics.

Dad helped me take the board upstairs where I went to work! I showed you how I made the headboard in the Bub’s room and this was nearly identical till I got to the tufting part.

Like that one, I used mattress pads instead of foam from the craft store:

foam mattress for upholstered headboard

Why this instead of regular foam? One word – cheaper. ;) Foam is a petroleum based product, so it goes up with the price of gas. Which means it’s just going up and up over time. I haven’t even check the price lately but for three inches of foam for a nearly 80 inch headboard wouldn't be cheap. The size was another reason – I would have had to use numerous pieces of foam to cover this and when you use the mattress pad you can get one big piece.

I had one I had picked up on clearance years ago (look for the XL twin sizes after back to school – you can find them for cheap!) but it was too small for this headboard. So I ended up with a bigger size (queen I think?), then ended up going back to get another one to do two layers because I really wanted it super soft.

One of the things I grew to dislike about our old headboard was how hard it was. I mean, it was wood, so yeah. And it had a curve to it so our heads never fit against it. First world problems. This time I made the headboard tall and cushy that we could comfortably lean against it.

Once the foam is down, you want to secure it with a layer of batting or thin fabric. I used batting first just because, again, I wanted this super soft. And I already had some, so that helped too:

DIY tufted headboard

Then I used a piece of muslin I had in my stash too, to cover everything again. This just secures all the foam and gives you a nice base for the final fabric.

Speaking of that – after all that I was ready to finish it up – and because I was feeling lazy and didn’t want to drive the extra 15 minutes to the fabric store, I actually shopped the drapery aisle at Target:

I wasn’t sure exactly what color I wanted so I grabbed a few. ;) The two on the left were $17 for a panel – which compared to a couple yards of upholstery fabric is pretty good.

Problem was we weren’t crazy about any of them when we tried them out. One was too light, one was too blah and one was too dark.

Soooo…the next day I went to the darn fabric store. ;) I needed the stuff to tuft the headboard anyway (at first I wasn’t planning on tufting. Scared, remember?) so I took a quick look through the fabrics and found one I LOVED in the suit fabric aisle.

Before I used that I figured out where I wanted my tufts and drilled the seven holes:

DIY tufted headboard

I just wanted it to be a simple design and some of the tufting I see is just too much for me. So when I did my math I decided to just do three across the top and four under that. That’s it – anything lower would always be covered by pillows or the mattress so I didn’t even worry about the bottom.

After the holes were drilled I added the final fabric:

DIY upholstered headboard

By the way, years ago I tried the electric stapler you can find at the hardware store (about $30) and it is kind of a pain in my butt to use. It gets jammed and the staples don’t go in evenly no matter what I do. I always revert back to my regular stapler (above) – it takes more muscle but that’s good for ya. ;)

Sometimes the corners can get tricky, so I’ve always used a simple method – start with the middle, then each side, pulling tight each time:

upholstering corners of headboard

For the curved corners I just grabbed the fabric and stapled as best I could:

upholstering curved corners

Remember…no one will see this part. Seriously, the back doesn’t matter. Do what you gotta do!

Here is is in it’s (almost) finished state:

DIY upholstered headboard

Getting there! The suit fabric is like a gray linen and looked so good. Way better than the drapes I picked out – I returned those.

Now the part I dreaded…the (shiver) tufting. So not hard. At all. All the stuff I needed was in the same section at Joann’s. I picked up this waxed thread and it rocked:

wax thread for tufting

It made this SO easy. More on that in a minute.

I grabbed some buttons too – it’s so easy to make your own fabric-covered buttons:

DIY buttons

I just used scrap fabric to make them all. Making buttons is fun.

So the tufting was a breeze – I couldn’t believe I had put it off all this time! I did poke myself a couple times, but overall, easy. :) First up, I threaded one of my long upholstery needles and made a little knot at one end, then stapled it to the back of the headboard:

how to tuft a headboard

Then I pushed the needle through the headboard, threaded the button on, and pushed it back through to the back. This is where the waxed thread comes in super handy – it kind of held the button where it was while I secured it to the back. Regular thread would slip and be hard to keep where you want it. This worked GREAT.

I would just put a staple in the back of the headboard, but wouldn’t push super hard on the stapler, so it didn’t go all the way into the wood. Then I was able to wrap that thread around it a few times, then hammer it down to secure it. (Pic on the right.)

I didn’t pull each button super tight – I didn’t want it to be a deep tuft. Just a little bit of tuft. And there is an easier way to do this by the way – you can just thread both ends of the thread on the needle with the button already on it, then put it through from front to back and then secure. But that method didn’t work for me because the waxed thread was so thick.

I was THRILLED with how it looked! I finished it up with some nailhead trim along the sides:

The particle board I used to make the headboard was 1/2 an inch thick and I went that size on purpose – so these would have something to grab onto. Any thinner and it would have been hard to get them in well.

I’ve never used the connected nailhead trim (I usually just do them individually) but wow, this made it so simple! The nailhead stuff is $21 for five yards, but I had two coupons so I got it for about $10. :)

I hung this up the same way I did in the Bub’s room – I just used picture hanging jobbies:

hanging a headboard

I figured out where the studs were and screwed into those in first, then that determined where I put the hangers on the back of the headboard.

When we got it hung I was so dang happy with how it turned out!: diy tufted headboard

You can see the nailhead trim better in that pic. From the front you don’t see it as much, but it’s a great little detail when you get up closer. I love it!

You can see there why I didn’t add any buttons any lower too – they’d just be covered.

Many of you have asked about the new bedding – I found it at HomeGoods earlier this year:

It’s by Hillcrest and it was a duvet cover and shams for $40. I had been looking for new bedding for months and just happened to find this, new sheets (they aren’t on now – they are darker and I’ll put them back on later in the fall) and the small pillow on the bed all in one trip. None of them are supposed to go together but I think they work well!

So far with what I made on the old bed, I’ve still got about $300+ to spend – I think I may make money on this redo! That’s what I’m talking about.

You can find upholstered and tufted headboards all over the place, but I promise you they are not hard to make on your own! It does take some time so just be patient with it. But you will save tons if you DIY this one -- the Pottery Barn bed on the left is $1000 for a king (gulp), the Ballard Designs on the right is $500+:
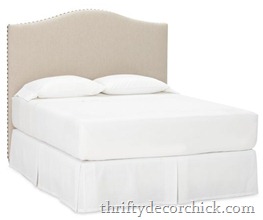
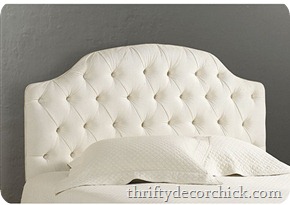
 Pottery barn upholstered headboard ballard designs camden headboard

I think mine looks pretty darn good for less than $100:

DIY tufted headboard

Here’s the break down on cost:

Wood: $15
Foam: $45
Fabric: $8
Buttons, nailheads, etc: $25

Total was $93! Aww yeah. And I have wood, foam, nailheads, buttons and thread left over to use on future projects.

If you went with one layer of foam/egg crate that will go down about $20. I had the batting and muslin but only one of those is really needed and they are both cheap. Of course of you skip the tufting that will help too!

Overall I’m so happy with how it turned out. And it is SO much more comfortable than our old headboard. Have you ever made your own? Did you find it easy to do? Have you ever attempted the tufting? Are ya sceered? 

Senin, 22 Juli 2013

Our new bed! (Bedroom redo)

Hello all and welcome to a new week! Whoot!(?)  :)

Hope you had a lovely weekend! I was busy finishing up some big changes to our master bedroom. It’s still no where near done, but a BIG part is done and I’m. in. LOVE.

So this little redo was going to happen anyway, but it was hurried up a bit when I found out we were getting a new bed. It’s a long story, hang in there with me.

I’ve mentioned a few times over the past year or so that I’ve been wanting to move on from our four poster bed we’ve had for years:

dark wood four poster bed

We got it at Bombay company seven years ago and got a smokin’ deal. It was $1000 and I got it 40 percent off ($600). Now the same bed goes for $1,400:

bombay four poster bed

Ours was still in great condition. For months I thought about reusing the base part (cutting down the legs and posters), but I realized it would be such a waste. Instead I sold it on Craigslist and made enough to cover the entire master redo! (I hope anyway.)

Side note – my Dad helped me assemble that bed seven years ago this past April, and the day after we did that I found out I was pregnant with the Bub. :) I’ve always known exactly how long we’ve had it because of that.

Anyway, it was lovely. But over the years I realized it was making our room feel small:

traditional bedroom

Our bedroom is huge -- about 20 by 17 feet and most of the room has really tall ceilings, but that bed was SO BIG. Oh, and I needed a stool to get up in it. At first that was fun, but I’m getting to dang old for that. ;)

So I knew it was going to go, I just didn’t know when. We’ve needed a new mattress for years now (ours was nine years old), and I knew I wanted to wait till we got a new one to tackle a new bed.

And then I got an email that made me do a double take – the Sleep Number folks asked if I wanted a bed. Uh. Yeah? I emailed them back and asked if they meant to say that. Yes, they did. Then I asked, for real, do I get to keep the bed? They said yes.

I’m not joking, I still think they may come pick it up. :) So after my initial dancing around our house with joy, we went to our local store and a totally friendly guy named Paul showed us our options. It was between the M7 and the P5. I didn’t know what those meant, but it turns out the M7 is the memory foam version:

sleep number bed memory foam

I was hesitant about the memory foam because I get SO hot when I sleep. I need to be totally cool to get a good night’s sleep and I’ve heard foam is notorious for making you hot. But their version is made with stuff called CoolFit that is supposed to keep you cool.

The P5 version is the more traditional bed – if you have a sleep number you may have this since it’s one of the most popular versions:

sleep number bed p5

There was something about that foamy bed though. Seriously. After we sunk into both versions we felt like we sunk even further into the memory foam one. Major cush factor.

You can see how happy I am in this horribly unflattering picture:

I had just sunk in. It was freakin’ awesome.

It took a while to get the bed – I don’t know if they make them for each customer specifically but you need to be patient to get your cush. It really wasn’t bad – about four weeks later and the delivery guys where here:

sleep number bed

So I mentioned I had four weeks, right? I knew I wanted to paint at least the wall of stripes on that back wall before the new bed got here – and I had FOUR WEEKS. But in true Sarah form, I was frantically painting the part behind the bed minutes before they arrived.

Sweating. And cursing (myself). A little.

Why did I wait? Well, they did move up the delivery a few days, which was a nice surprise. So there’s that. But otherwise…I still had plenty of time. It’s just how I roll.

I wanted to get that part of the wall painted because for some reason I thought the bed was going to be mega heavy and too hard to push around later. I don’t really know what I was thinking – I mean, AIR is a big part of this type of bed: sleep number bed

Smartness, ‘tis me.

They assembled everything in no time at all and gave me a nice tutorial on how to use it:

sleep number bed memory foam

This is the part where I’m sure they were like, uhhh, why is this chick taking pictures right now?

I have to admit I was a little overwhelmed at first – I was afraid I was going to do something wrong with the remote and the filling and all that.

The Bub and I were so stinking excited – he helped me make the bed and we filled it and giggled and let the air out and giggled and took pictures and sent them to my husband:

We were a little giddy. There was lots of turning the number down to 10 or as low as it would go just to see how much we’d sink in. It was awesome.

So I have to say…we're hooked on this bed. I don’t know why I was worried about the operation – it’s easy. You just set your number in the remote and push it before you go to sleep – hardly any effort at all. And I have to say – I was worried about having a remote, because I lose them constantly. But I haven’t lost this one once. It’s magic or something. (Just give me time…)

sleep number bed

And even though ours is the memory foam it doesn’t get hot at all – I haven’t noticed that it’s any warmer at night than our other bed. (And that’s saying a lot because it’s the middle of summer and our bedroom is always the warmest room in the house.)

So anyway…that’s what spurred on the room redo! And it’s well on it’s way. It’s going to look completely different than before:

DIY tufted headboard

So far I’ve painted (one wall – and I haven’t even cut in yet, as you can tell), made the new headboard and found the new bedding. I actually found the bedding months ago – LOVE it.

There’s so much left to do! New art, new window treatments. And the bookcase nightstands are going ASAP – I had to use bookcases with our old bed because the bed was so high. Now I’m afraid I’m going to knock my head into the corner of mine when I get out of bed in the morning:

DIY tufted headboard

I think every room needs some black, but these are just black holes in here right now.

I already have lamps (I’m moving the previous sconces somewhere else in the house) and was waiting till I find nightstands to bring them in, but it looks so empty without them! I may bring them up today.

I’m so excited about how the headboard turned out!! Next I’ll show you how I made it and more about the bedding. (This week.):

DIY tufted headboard So here’s the thing though – I decided on that fabric for the headboard after I painted the wall. Now I think I want to go even lighter on the walls. It matches a little too much for me – I think I want more contrast. At least I’ve only painted one wall. See? I procrastinate for a reason. Or something.

OH! We got something else recently – our new little nugget:

little nugget kitten

We named him Colby and he’s still just a little peanut. We got him early because he was rescued from a bad situation – all of his siblings died. :( We’ve had him for a couple weeks now and he is adorable! But he’s climbing on the new headboard so someone is getting their nails trimmed today. :/

So there you go – our new bed and the start of our bedroom redo! The biggest part of the redo is something I’m hiring out – hardwood floors! Not sure if they will happen this month or next but I cannot WAIT. We want to do the whole upstairs but it was too expensive, so we’re piecing it out room by room. And I already have an amazing rug that I got last Christmas that’s going in here. So excited!!

Overall we’re thrilled with our Sleep Number – we love it! We are sleeping better than ever – I noticed from the first night that I don’t toss and turn nearly as much. In our old bed I would wake up so many times a night to turn over and try to get comfy, now it’s a couple times if that. That was a biggie that I noticed. Oh, and my number is 30 (super soft) and hubby’s is 45 or 50. I love finding out people’s number now. ;)

Do you love your bed? Do you have a Sleep Number? I’ll share the headboard tutorial soon!

Senin, 24 Juni 2013

Dark or light side?

Hello all! Hope you had a great weekend! We took a little road trip to the Chicago area for a couple drum corp shows (for hubby), Legoland (for the kiddo) and IKEA (for me). It was a fun, quick trip!

So now that the powder room is done I’m moving on to a room I’ve been itching to change up for a while – our master bedroom. I made some changes earlier this year using things I already had, and the room got a few other changes a couple years ago.

We have a new addition coming to the room that kind of spurred a new redo on but I’ve been wanting to change some things up for a while – No. 1 on my list is getting rid of the striped wall behind our bed. It’s given me the itches for a few years now.

But my biggest dilemma before I can really get moving is the wall color – I’m torn between the allure of a deep, dark wall color and the light and bright look. I STILL can’t decide. Every time I think I have I see a new picture and it takes me back to the dark side. Or light. Or dark.

You get the idea.

I’m drawn to the moody, comfy feeling of a dark room:

dark walls bedroom

(source)

Did you notice the trim is painted the same color as the walls? What do you think of that?

Although if I went dark I would keep the headboard light like Dear Lillie’s room:

dark brown walls white bedding

The light bedding brightens up the room and gives great contrast – I’m a lover of contrast you know.

I actually have a sample of a deep navy color like Carmel’s room:

dark walls dark wood bed

Mine has a little more of an aqua tint to it, if that makes any sense – like a peacock blue. Can I just say how much I LOVE that mirror above her bed too??

In general I think it’s easier to pull in colors with a lighter room, but I love how color was used in this room, even with the dark walls:

dark walls with aqua and blue

(source)

I do love the pop of pink with the dark chocolate walls in this bedroom:

brown walls white bedding

(source)

Just not sure the hubby would go for that. ;)

Here’s a great example of how a darker color completely changes the look of a room:

light room redo to dark walls

(source)

There’s plenty of other changes too, but isn’t funny how much bigger it looks in a dark color? You always think it will be the opposite but that’s not always the case.

But here’s the thing – I’m finding I’m loving the power of a neutral wall color. It’s soothing, yes, but it also allows you more options when it comes to decorating with color:

decorating with color lighter walls

My friend Layla’s old master bedroom is one of my favorites:

cottage style bedroom I love that the walls and bedding are light but the room is still so warm and colorful.

I think it’s evident by my photos (and recent projects) that I’m loving the wall planks:

white walls, black and green accents

(source)

I just adore that room – I think every room can take some black pieces and this looks amazing with the white walls and green accents. Love!

And no, I’m not planking our bedroom walls – I need a break from the painting for awhile. ;)

Of course it doesn’t have to be white on the walls – I don’t think I could do an all white room anyway. This greige-ish space is just beautiful:

light room with blue and greenI love that you could pull in pretty much any accent color and it would work. It’s that a gorgeous room?

I love this blue color too – and it proves that a lighter color can still offer plenty of contrast against white trim:

two story bedroom

(source)

I also love that there are plenty of darker accents in there (rug, chairs, ottomans) that offer some depth without making the room really heavy.

Overall I just love the idea of a calming, serene space:

molding same color as walls

(source)

But the thing is, our current wall color is darker (Tornado Watch at Lowe’s) and it feels super cozy too:

dark walls bedroom

A dark room feels like a hug to me, a lighter one feels like a big breath of fresh air.

Decisions, decisions.

A few months ago I was getting ready to slap a deep color on the walls, now I’m leaning big time toward a light color. I think I’m ready for a change!

What is your favorite for a bedroom – dark or light? Do/did you struggle with your wall color like me or did you know exactly what you wanted? Do tell!

P.S. I also painted the Bub’s room a dark blue but kept it light with lots of white trim – you can see it here.